Linking Unmanic Installations
Multiple installations of Unmanic can be linked. This allows tasks to be processed in a distributed fashion.
Instructions
Requirements
- At least two installs of Unmanic:
- One install has access to the filesystem containg the media to be processed. For the purpose of this guide, we'll refer to this install as
main. - The other install will be called
remote. This has to be reachable frommainbut does not require access to the files as they will transfered to and frommainas needed.
- One install has access to the filesystem containg the media to be processed. For the purpose of this guide, we'll refer to this install as
Link Setup
On main, setup a library. For the purpose of this exercise, this library will be named Guide.
Linking relies on libraries sharing a common name. Therefore, create a new library on remote with the same name; in this case Guide. Either export the library from main then import it on remote (see tip below) or set it up manually. The library on remote only needs plugins related to making changes, i.e. encoding. "Scanning" plugins, such as filter by size, are not needed.
:::Note It is recommended to create a new library for this, instead of using the default library. :::
On main, use the plus sign to add a remote installation:
- Enter the service address of
remoteusing either the IP or hostname. For example,192.168.1.3:8888`. - Accept
Nonefor authenication. - Click
Add. - Click the
Configureicon and enableSend tasks to this installation when workers are available.
Once setup, the once grey logo should now turn blue. This indicates the remote installation is connected. The final result should look like this (as of version 0.2.4):
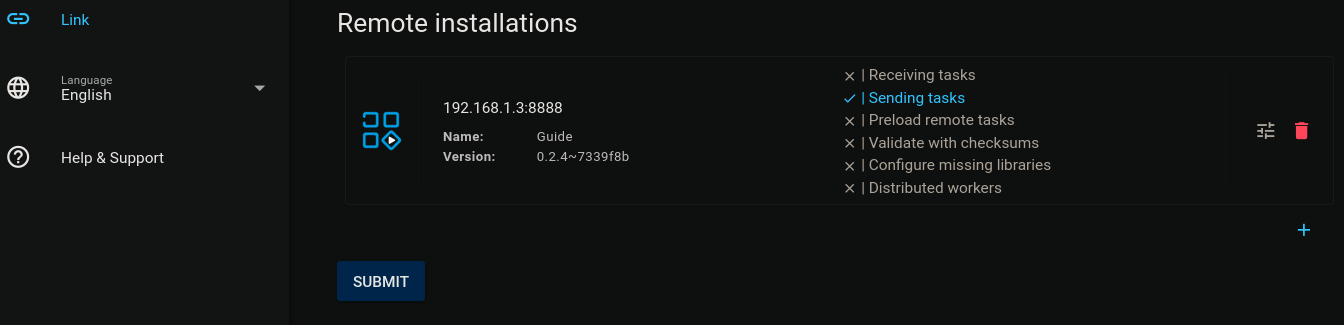
Pending tasks on main should now be sent to remote. This may take a few minutes, depending on network speed.
:::Tip
You can export the library configuration from main using the export button, copy the code shown in the panel that opens.
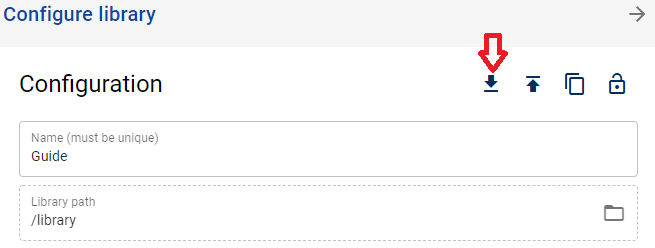
You can then use import on remote to paste the code.
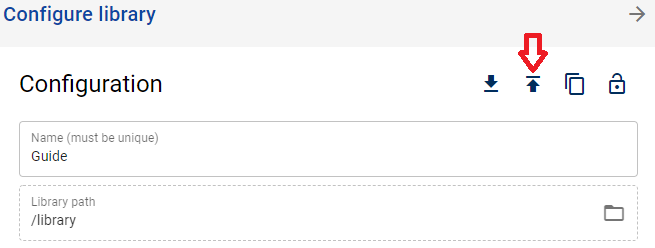 :::
:::Route Tasks with Tags
At this point, this documentation makes the following assumptions about the existing setup thus far:
- 2 installations of Unmanic exist on the network;
mainandremote. - Both installations are connected via
Link. - Each installation has 1 library setup.
- The library on
mainhas eitherFile Monitor, and/orLibrary scannerenabled (based upon the needs of the reader). - The library on
remotehas bothFile MonitorandLibary scannerdisabled.
- The library on
For the purposes of this exercise, our objective now is to ensure all work is sent exclusively to remote. In order to create this pipeline, proceed as follows:
- Add a tag to the library on
main. We'll use the string "work" with no quotes. Remember to hit the Enter key after typing the string or the tag won't persist. - Add the same tag to the library on
remote. - Add the same tag to the worker on
remote. - Ensure this tag is not present on
main'sworker.
With this setup in place, the work flow operates as follows:
- The library on
mainwill be used to initiate all pending task (based on scans or file monitoring). - Each task will be sent to any linked worker with a matching tag.
- Once the file associated with the task is tranferred to a valid worker, it will be processed according to the libary found to have a matching tag.
- Once processing is complete, the file will be tranferred back to
main.
In all cases where greater insight is needed (troubleshooting, etc), each Unmanic installation can have EnableDebugging toggled in the Logs section of the Help & Support page.